


Add a (Variable) Product
Variable Products are those that come in various sizes, colours etc. Variable products are displayed as one product in your store and users then choose a variable before the item is added to cart.
Enter the Product Name & Description:
- Type a meaningful TITLE
- Type or Paste the PRODUCT DESCRIPTION and use the Text formatting tools as desired.
The Product Description is the main text content on the Product page. An original Product Description, one that is written by yourself is the best way to ensure your website is highly ranked in the search engine for users searching for the product. Alternatively you can copy and paste the description from the manufacturers website.
Choose a Product Category and Tags:
- Tick the appropriate CATEGORY(S)
- Or add a New Category
- Click Add New Category
- Type the Category Name
Categories are the main way Products are grouped. Products can be in more than one Category at a time. Categories are also Hierarchical, so you can have Parent and Child Categories.
3. Begin typing the TAG name into the box provided. Existing Tag names will appear as you type.
4. Click on the TAG name or Type a new Tag
5. Click OK
Tags are a way of linking similar content. They are similar to Categories but are usually more specific and they don’t have a hierarchy. A Product can have numerous Tags.
Choose the main Product Photo
The Product Image Palette is along the right side of the screen, near the bottom. This Image is used as the main product photo. More images can be added into the Product Gallery. WordPress will automatically crop the image to fit in the allotted area.
- Click Set Product Image. The Media Library will open.
- To use an Image from the Media Library:
- Click on the Image
- Type a TITLE and ALT TEXT for the Image if it doesn’t have one.
- Click SET PRODUCT IMAGE
- To Upload an Image:
- Click UPLOAD FILES
- Navigate to the file and SELECT it
- Click OPEN
- Type a TITLE and ALT TEXT for the Image if it doesn’t have one.
- Click SET PRODUCT IMAGE
TIP: The Alt Title is important for Search Engine Optimization and is used when people search for images in the search engines. Use meaningful Titles that contain effective keywords that describe the photo. The Alt Title is also read aloud by screen readers used by the seeing impaired, so it’s important to fill these in.
Optionally add a Product Gallery:
- Click Set Product Gallery Images. The Media Library will open.
- To use Images from the Media Library:
- Click on the Images (holding the shift key to select multiples)
- Type a TITLE and ALT TEXT for each Image if it doesn’t have one.
- Click ADD TO GALLERY
- Click on the Images (holding the shift key to select multiples)
- To Upload Images:
- Click UPLOAD FILES
- Navigate to the files and SELECT them
- Click OPEN
- Type a TITLE and ALT TEXT for each Image if they don’t have one.
- Click ADD TO GALLERY
- Click UPLOAD FILES
Enter the Product Data:

- Choose VARIABLE PRODUCT. The default option is SIMPLE Product.

- Under the GENERAL Tab:
- TAX STATUS
- Choose the TAXABLE, Shipping Only or None
- TAX CLASS. Canadian Taxes have been setup for you, if your store requires international tax rates. Please consult a tax professional and we can add the rates as instructed.
- Choose STANDARD (for GST & PST) or PST EXEMPT. The PST EXEMPT class has been setup for most stores.

- Next to Custom product attribute, click ADD
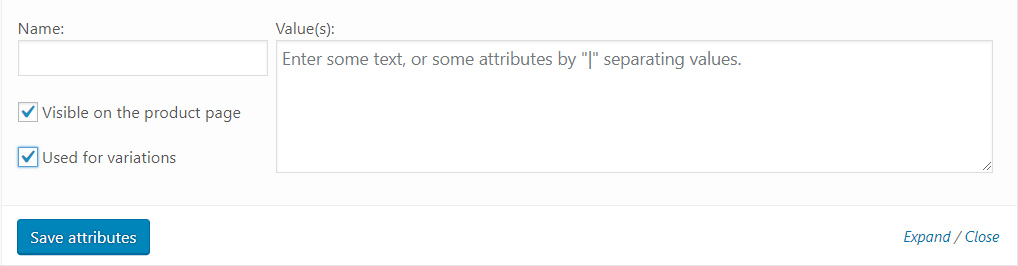
- Give the Attribute a NAME For Example: Size:
- Tick both boxes: Visible on the product page & Used for variations. Only the first one is ticked by default.
- In the Value(s): box, enter the variations with a | separating the values. The | is called the Pipe Character and it’s located above the Enter key on the right side of most keyboards. Use the Shift Key to access it. For example: Small | Medium | Large
- Click SAVE ATTRIBUTES when done. You can edit these values at any time as needed.
- Under the Variations Tab:
- Click the Add Variation dropdown menu and choose CREATE VARIATIONS FROM ALL ATTRIBUTES
- Click GO
- Click OK in the window that pops up. A variation of all your products will be created.
- Click OK again in the next popup that appears alerting you that the variations have been added.
You’ll now see a content tab for each of the variations you created.
- Click on each Variation to open it’s Tab
- For each Variation, complete the following:
- Enter a SKU (optional)
- Choose whether to Manage the Product’s Stock and back orders.
- Enter the REGULAR PRICE. Optionally enter a Sale price and Sale Schedule.
- Enter the PRODUCT’S WEIGHT AND DIMENSIONS
- Optionally Change the Shipping Class & Tax Class. By default they’re the Same as the Parent
- Optionally add a Description to the variation
- Optionally add a different image to the Variation by clicking the image icon:


Weights and dimensions must be added to each product. This allows the Shipping Calculator(s) to estimate the Shipping Cost for each product.

- For Variable Products, leave this area blank. The data will be taken from the Variation Data entered above.

- For Variable Products, leave this area blank. The data will be taken from the Variation Data entered above.
UPDATE or PUBLISH the Page or Post when done.  or
or 